Edirom Online Help (User Manual)
This document provides a general introduction to using Edirom Online. It describes the basic functions of the software. Please note that not all of the
options described here are necessarily available in every edition using Edirom Online. This is due to the fact that contents have to be prepared
accordingly and projects using Edirom Online have their own edition guidelines and concepts. Furthermore, some versions may contain more options than
mentioned in this document due to edition-specific enhancements.
User interface
The user interface of Edirom Online is divided into several sections. At the top and bottom borders of the window you find
Toolbar
and
Taskbar
that provide access to all major Edirom functions. The space in between is called
Desktop
. At the top right corner of the Desktop is the so-called
Navigator
.
Navigator
At the top right corner of the Desktop, right below the Search Field, is the so-called Navigator. The
Navigator contains an edition-specific list of content objects potentially
organized in categories. Clicking on an item opens the corresonding item in a new
window in the workspace.
In case the navigator holds very many objects, a scroll bar located along the right
edge of the window lets you scroll through the contents of the navigator. You can
also scroll using the wheel of your mouse, if applicable.
Although always fixed to the top right corner of the workspace, you can resize the
Navigator deliberately and also
reduce it to a narrow bar below the
Search Field
, by drag-and-drop on its left or bottom
edges.
Desktop
The Desktop is the space between Toolbar and Taskbar. In this space all internal application windows are opened and arranged in order to show contents of an edition or to give access to further application functions. The internal application windows cannot be dragged out of this area. See Content windows for further details.
Taskbar
The Taskbar at the bottom of the Desktop gives access to content-related functions on the left, and meta-functions on the right.
Sort windows horizontally
Open concordance navigator
Search
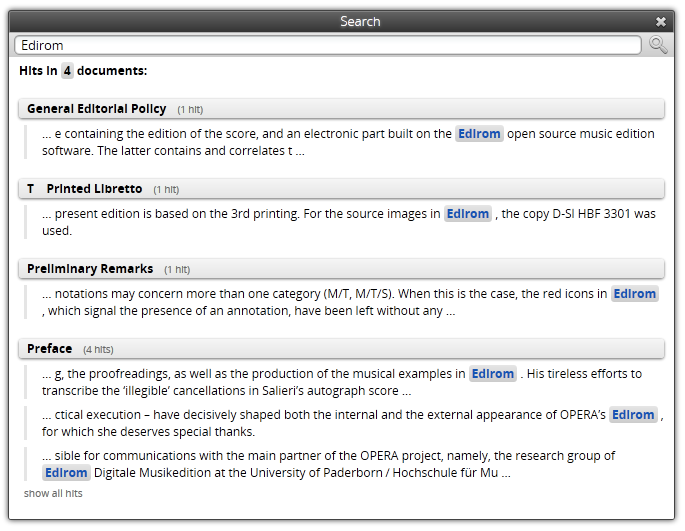
The Search window can be opened by clicking the Search button (magnifying lens) on the Toolbar or by entering a search query in the Search Field and hitting ‘Return’. It will perform a text-based search on all edition contents.
After performing a search operation, all resulting hits are grouped as one result entry for every corresponding content item (text document, annotation, etc.). Furthermore, individual hits are highlighted within their surrounding context.
Clicking on an entry's title or on a highlighted search hit opens the corresponding content item with all search hits highlighted.
If a search operation scores more than three hits per entry a link named ‘show all hits’ will appear.
Navigator
The Navigator offers quick access to the objects contained in the edition, which are opened by mouse click in a new Content windows on the current
Desktop
.
The number of objects held by the Navigator may exceed the actual size of the panel. In this case a scrollbar at the right side of the window permits to scroll through the contents
of the Navigator. The mouse wheel may be used as well.
Although the Navigator is fixed to the top right corner of the workspace, it is possible to resize and even to reduce it to a narrow
bar below the
Search
button by drag-and-drop on its left or bottom edge.
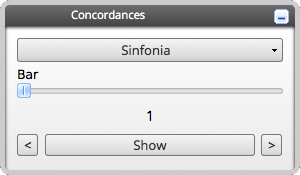
Concordances
The Concordances
provides navigation by concordance,
affecting those contents in windows currently open and associated with the concordance.
Different concordances can be selected from a drop down menu. Furthermore movements etc are accessible through a second drop-down
If the selected concordance has subdivisions (e.g. movements) a second drop-down menu will appear to choose between them.
Slider with number indicating current connection; click display to trigger; use arrowheads to navigate back and forward step by step.
mehrere Konkordanzen und editions spez
Below the slide control is a large button labeled Show. Click on this button to open the selected measure in all open sources on
the current desktop. You can also navigate within sources using the two arrows
to the left and right of the Show button, which allow you to browse forward or backward. Depending on your settings , only windows which are already opened are affected by this. If this particular measure exists in other sources currently not displayed, a small button on the lower right will appear . This buttons lets you open all relevant
windows for the selected measure position and will rearrange all open
windows.
A common use is a measure concordance which lets you display the content of a particular measure in all facsimiles and scores of the current work open on the
Desktop
.
If the current work has more than one movement, a drop-down menu lets you select the desired one. Using a slide
control, you may select the measure to be displayed when you click the button
labeled Show.
Another example would be a concordance of scores and the corresponing verses of
a libretto, in order to simultaneoulsy display the corresponding musical
setting alongside a particular verseline. The presence of certain concordances
depends on the particular edition.
Content windows
Content windows can be manipulated within the program in virtually the same
way as normal operating system windows. Along the top edge of the window is a title
bar that contains the name of the displayed item.
Below the title bar each window contains a Window toolbar. At the very left of this is a combo box for switching between Views; Views offer differnent perspectives on the content
currently open in a window (e. g.
Text
,
XML-View
,
Facsimile
,
etc.) At the bottom edge each window might contain a view specific Window taskbar with tools for manipulating the
respective object. The availability of is
dynamic and thus depends on the object being displayed. For example:
-
View
- This is standard for all windows containing multiple views and allows for
switching between views.
The object concept of Edirom Online has
changed in comparison to the former Edirom Viewer, switching to a much
more flexible and dynamic concept of objects. Thus windows no longer are of a certain
type but dynamically provide views to an object depending on its contents. For a
translation of the former window types to the new view concept see the below
table.
| Type of content |
Available views |
Comparable Edirom Viewer object |
| XML resource |
XML view |
- |
| Editorial text in TEI |
Metadata view, Text view, XML view |
Text |
| MEI file |
Metadata view, XML view |
- |
| MEI file with associated facsimile images |
Metadata view, Facsimile view, XML view |
Score window |
| MEI work file |
Metadata view, Annotations view, XML view |
- |
Each open window is represented as button in the Taskbar holding the window title, a feature that might be
known from certain computer operating systems. Clicking on this entry toggles show/hide window function.
When multiple windows are open, the entry in the Taskbar indicates which window is currently
active (and will thus react to certain key combinations):
The corresponding entry of the currently active window is highlighted in contrast to
those of non-active windows. Windows can be
arranged on the desktop as desired by on
the title bars.
At the right end of the title bar are three buttons:
Windows can be resized by dragging any
edge or corner of the window frame. This allows the user to customize his or her own
workspace.
In addition to other content-dependent control elements,
some advanced window organization options are also available (already
described above, see
Taskbar
).
Text
The entry Text is available on a window's
View Menu if the
content item of the window is a text-based item, e. g. a TEI file. The text appears in a form similar to that of a website and may
include links to other content (depending on the edition, appearance of actual
links may vary). Clicking on these links opens the corresponding item in the same
window. To open the link in a new window, hold down the Control key
(Windows) or the Command key (Mac OS X) while
clicking.
Text view specific controls will appear in the Window toolbar, these include:
Window toolbar
-
Go to…
- This combo box allows to skip to a certain
chapter of a text.
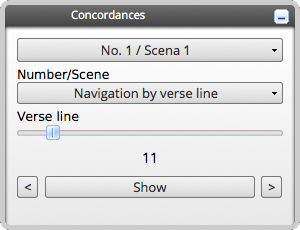
Facsimile
The Facsimile shows source images and provides controls for navigating in a source.
The Window toolbar of the facsimile and score window contains the following additional control menus:
-
Display
- allows configuration of displayed layers, or superimposed measure numbers
(for a detailed description see
Display
).
-
Annotations
- allows configuration of superimposed annotation symbols (for a detailed description see
Annotations
).
-
Go to…
- allows jumping to certain measures or movements of the current source (for a detailed description see
Go to…
).
The Window taskbar contains following controls for navigating the source contents:
Some additional controls appear when switching to the Measure based view:
Zoom level can be increased or decreased using the scroll function of the mouse wheel. At the bottom of the window, you can browse the different pages of the source .
XML-View
Selecting XML-View from
View Menu shows the
XML data of the current item. A couple of controls are added to the corresponding
Window toolbar, being:
-
A-
- This is the
Decrease font size
button that lets you decrease font size in the XML-View
-
A+
- This is the
Increase font size
button that lets you increase font size in the XML-View
-
Line #
- The
Show line numbers
button lets you show and hide the line numbers on the left hand side
of the XML-View.
Annotations
Selecting Annotations from
View Menu shows readings or individual annotations from the Critical Report of the current item. The default appearance is a list of all annotations with four columns for following annotation detail:
-
No.
- Indicates the order of the annotations.
-
Title
- Gives the title of the annotation; often used to give a first impression of the annotation's subject matter.
-
Categories
- Indicates the categories assigned to a given annotation.
-
Priority
- gives the priority assigned to a given annotation.
Clicking on a column head will resort the list on the basis of this columns data, a seconnd click on the same column head will reverse the sort order. When hovering over a column head a arrowhead will appear on the right edge of the column title, giving access to a context menu that allows for:
- setting sort order.
- showing/hiding columns.
- applying a filter on the respective column.
Double-clicking on an annotation entry in the list will switch to a focused view of all the annotation's details. This again allows for three different kinds of display, available through the Display menu added to the Window toolbar. All available display modes offer complete annotation text and metadata but differ in the way the present corresponding sources as follows:
-
Grid view
- presents images of all corresponding sources in an overview grid, double-clicking a single item shows this item in Single view (see below).
-
Single view
- shows the respective source detail maximized to the annotation view's boundaries; arrow heads to left and right allow for stepping through all images. Double-clicking returns to Grid view (see above) or List view (see below), whichever you entered this view from.
-
List view
- Gives a list providing corresponding Source and Title.
Moreover following controls are added to Window taskbar:
Working with annotations
Annotations from an edition's Critical Report can be accessed in different ways through Edirom Online. (1) Icons displayable in the sources already provide a great deal of information as tooltip and allow accessing the complete Critical Report by double-clicking the icon. (2) The complete Critical Report usually is available through a work object's
Annotations
.
Moreover Edirom Online provides additional means for adding accessing individual annotations by assigning them Categories and a Priority. The specific use of these options depends on the applicable edition guidelines, for example in terms of the categories actually used. Therefore, the following descriptions should not be considered complete documentation but simply an introduction to the basic concepts.
Priority
An annotations Priority gives a hint towards its relevance for the edition. Visualization of an annotation's Priority in
Facsimile
is achieved by color-coding the symbols:
Categories
Annotations are typically assigned to one or more Categories, each of which may have its own symbol. These symbols are likewise displayed in the color coded box when displaying annotation icons in the
Facsimile
. It is thus possible to determine the type of annotation content by its symbol.
The annotation categories that are actually available depend on the edition. Typical examples include slur placement, expressive marking or articulation.
Filtering
Filtering the display of annotations is both possible in the
Annotations
menu and
Facsimile
. For respective descriptions see the corresponding sections of this document.
All annotations belonging to at least one of the selected categories are shown in the facsimile. Please note that filtering by multiple categories will yield all annotations assigned to at least one of these categories; filtering for annotations assigned to all selected categories is not possible.
Help (Edirom User Manual)
The Help (Edirom User Manual) window is (in contrast to content related windows) a stand-alone window and can only be opened once. Clicking the button several times
will toggle show/hide for the help window, respectively bringing it to the foreground if hidden behind other windows.
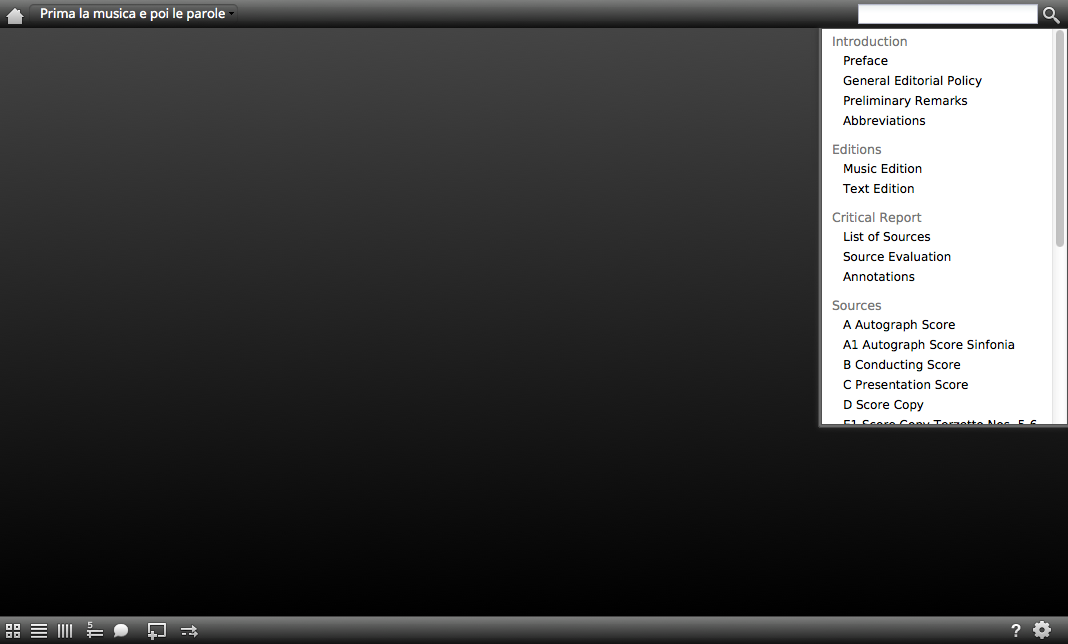 Figure 1. A sample view of an Edirom Online screen, showing Toolbar (top), Taskbar (bottom), Desktop, and Navigator (right).
 Figure 2. Detail view of the Toolbar.


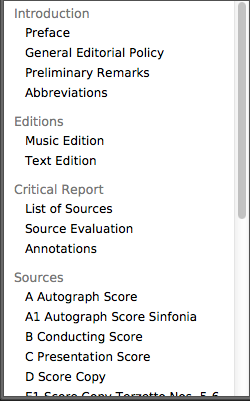 Figure 3. A sample navigator. Behold the scrollbar on its right edge.
 Figure 4. Detail view of the Taskbar